Login agent (GINA/Mac/Linux) customization
Under the GINA/Mac/Linux (Ctrl+Alt+Del) customization section, you can modify the appearance and functionality of the login agent installed on the computers in your organization.
Login agent customization steps

- Log into the ADSelfService Plus portal using administrative credentials and navigate to Configuration > Administrative Tools > GINA/Mac/Linux (Ctrl+Alt+Del).
- Click GINA/Mac/Linux Customization.
- If you want to replace the default login agent icon on the login screen, you can upload the new icon by clicking Browse from the Icon field.
Note: Only BMP files (of size 48x48) can be used as the GINA/macOS/Linux icon.
- In the Button Text textbox, add the text to be displayed as the clickable login agent button on the machine login screen. The default text is Reset Password/Unlock Account.
- In the Frame Text textbox, add the description to be displayed next to the login agent button on the machine login screen. This setting pertains only to Windows XP.
- In the Configure Access URL field, specify the URL that the login agent requires to connect to in order to access the ADSelfService Plus server.
Note: Please make sure to configure the access URL if you are using a reverse proxy for the ADSelfService Plus server or have blocked direct access to the ADSelfService Plus server for end-users. Click here for the steps to configure the access URL.
- Click Save.
Note:
- These settings will be not be applied to existing login agent installations. They will only impact installations carried out after the configuration is
saved.
- To apply these configurations to existing installations of the login agent, run the GINA/Mac/Linux customization scheduler.
Advanced Settings
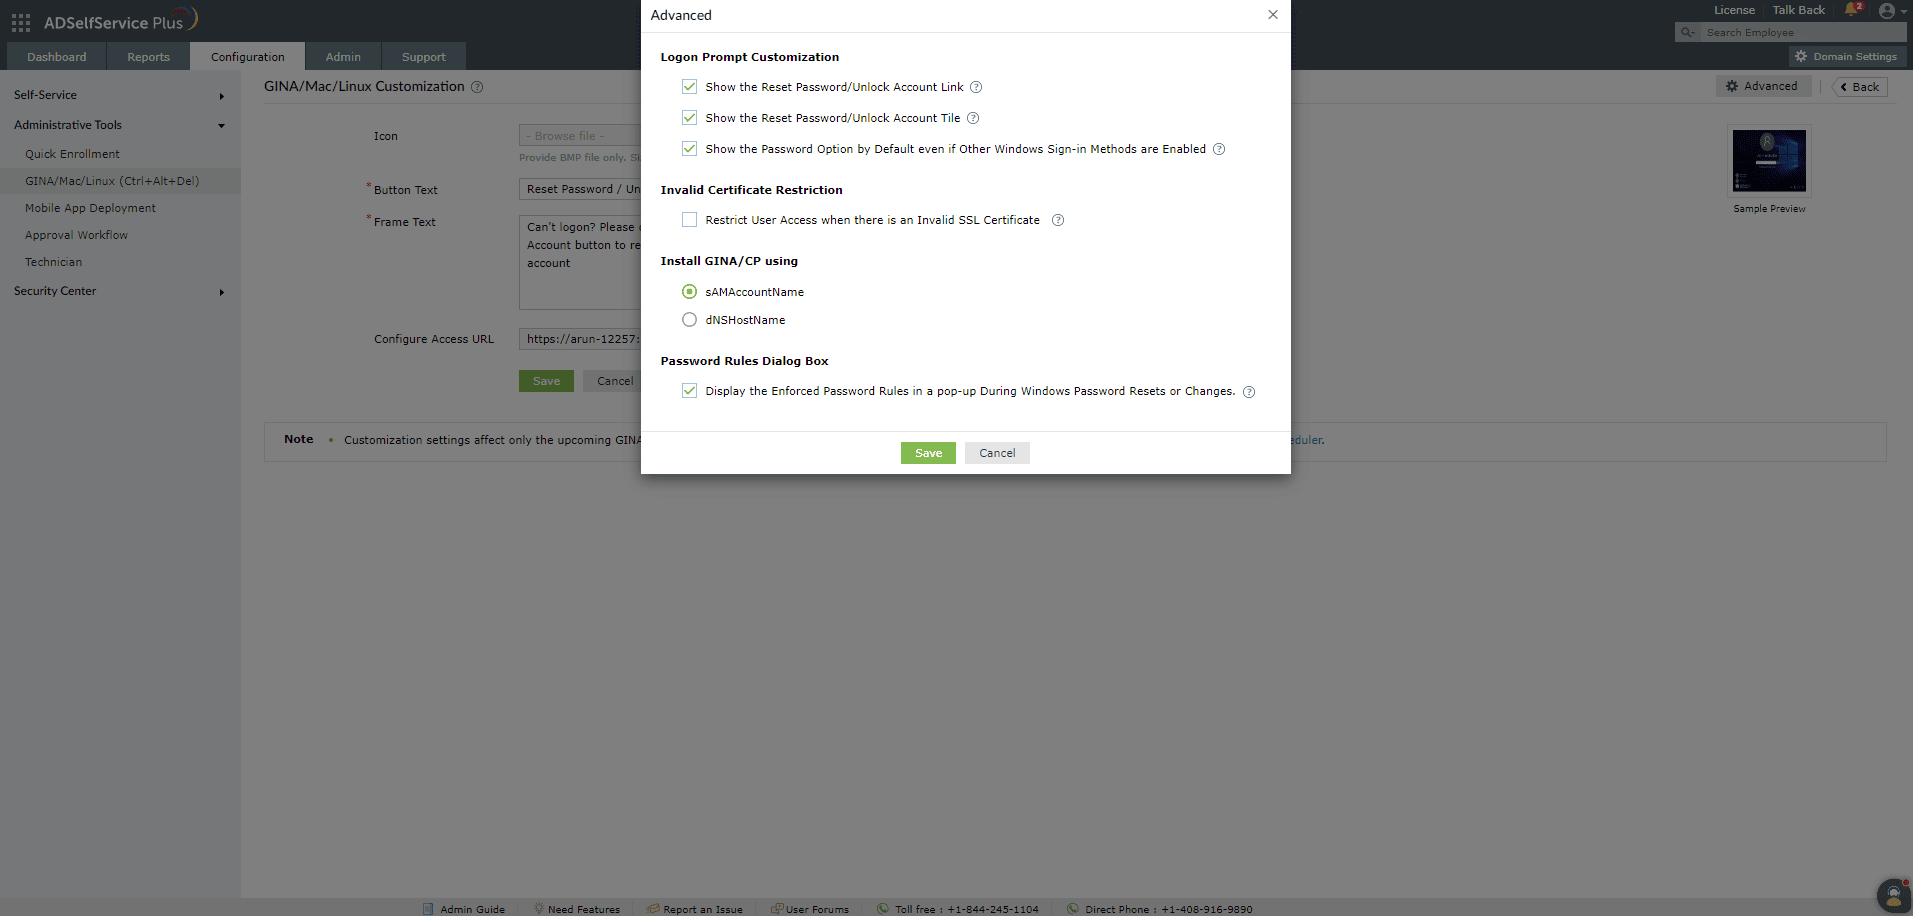
- To configure advanced settings for the login agents, log into the ADSelfService Plus portal using administrative credentials and navigate to Configuration > Administrative Tools > GINA/Mac/Linux (Ctrl+Alt+Del) > GINA/Mac/Linux Customization > Advanced.
Login Prompt Customization
- Select Show the Reset Password/Unlock Account Link to display the Reset Password/Unlock Link on the machine login screen.
- Select Show the Reset Password/Unlock Account Tile to show the Reset Password/Unlock Tile on the machine login screen.
- Select Show the password option by default even if other Windows sign-in methods are enabled if you wish to display the password field by default for primary authentication even when other login methods like Windows Hello are enabled and being utilized by users . This setting pertains only to machines running Windows Vista and later.
Invalid Certificate Restriction
- Select Restrict user access when there is an invalid SSL certificate to restrict access to the ADSelfService Plus server from the Windows login agent whenever there is an expired or invalid SSL certificate on the workstation. This is supported for all versions of Windows and Linux, up to macOS version 12. Learn how to configure this for macOS 13 and above.
Install GINA/CP using
- Choose the computer attribute based on which a network connection should be made between the ADSelfService Plus server and the client machine during agent installation. This attribute can be either sAMAccountName or dNSHostName.
Password Rules Dialog Box
- Select Display the enforced password rules to show the password policy rules in the dialog view when the user tries to change or reset their password using the login agent.
Note:
- The ADSelfService Plus SSL certificate should be trusted in the Keychain Access app on macOS. This is mandatory for machines running macOS 13 (Ventura) and above.
- Open the Keychain Access app on the Mac running macOS 13 (Ventura) or later.
- Download and include ADSelfService Plus' CA certificate in the System Keychain, under the Certificates tab.
- Expand the trust section of the certificate and mark When using the certificate to Always Trust.
Localizing Windows login agent's user interface language
The Windows login agent can be customized to display the ADSelfService Plus portal in languages other than English.The information derived from the ADSelfService Plus server can be displayed in any of the 21 supported languages by following the steps here.
Other login agent information on machines, including the offline MFA feature and custom password policies, can be displayed in 7 languages: Simplified Chinese, Japanese, French, German, Turkish,Spanish, and Polish.
By default, the information displayed by the login agent follows the welcome screen display language settings on the Windows machine (Start > Settings > Time & Language > Administrative language settings > Welcome screen and new user accounts > Copy settings > Welcome screen display language). If the admin wishes to override this, they will have to alter the Windows registry in the required user machines, as when machine is offline, it won't be able to fetch custom language details from the product server.
To do so,
- Navigate to HKEY_LOCAL_MACHINE\SOFTWARE\WOW6432Node\ZOHO Corp\ADSelfService Plus Client Software in 64-bit machines or HKEY_LOCAL_MACHINE\SOFTWARE\ZOHO Corp\ADSelfService Plus Client Software in 32-bit machines
- Create a new String Value named LocaleID and provide the value corresponding to your preferred language as the ValueData from the table below:
| Offline MFA portal Language |
Corresponding value for LocaleID |
| Simplified Chinese |
zh-cn |
| Japanese |
ja |
| French |
fr-fr |
| German |
de-de |
| Turkish |
tr |
| Spanish |
es-mx |
| Polish |
pl |
Note: Localization of the login agent is only supported for Windows machines. Linux and macOS login agents only support the English language. To request other languages for the Windows login agent, or additional language support for the Linux and macoS login agents, click here.
Disclaimer: To ensure streamlined functionality and consistency of theADSelfService Plus login agent across the user machines, admins are not recommended to alter the Windows registry keys on user machines directly, except for the cases mentioned in the product documentation. Doing so could cause inconsistencies between the user machine and the server. It is recommended to use the ADSelfService Plus admin portal to make any changes to the login agent and its features, and either run the agent customization scheduler or reinstall the login agent to update the changes on all the user machines. For further clarification, please contact our Support team.


 ADManager Plus
 ADAudit Plus
 Exchange Reporter Plus
 M365 Manager Plus