SAML Authentication
SAML Authentication adds an extra layer of security to the password reset and account unlock process. If your organization already has SAML-based identity provider (IdP) applications such as OneLogin or Okta, it makes sense to use SAML Authentication as a method to verify users' identities. When SAML Authentication is enabled, users are redirected to their IdP login URL for authentication during password self-service operations. After successful authentication, users are routed back to the ADSelfService Plus portal where they can reset their password or unlock their account. To use SAML Authentication, end users do not have to enroll with ADSelfService Plus.
Steps for SAML Authentication
Configuration of SAML authentication must be done in two places:
- At the service provider (SP).
- At the identity provider (IdP).
Here, the IdP is the SAML-based identity provider application such as OneLogin or Okta. The SP is ADSelfService Plus.
Prerequisite Steps
- Log in to ADSelfService Plus web console as an administrator. Navigate to Configuration tab → Self-Service → Multi-factor Authentication → Authenticators Setup → SAML authentication. Click ACS URL/ Recepient URL and the Relay State.
- The SAML-based identity provider that you intend to use must have ADSelfService Plus as one of its SAML-supported applications. If it is not supported by default, you can add ADSelfService Plus as a new application in your identity provider.Find the steps to add a new application here: Okta, OneLogin, ADFS Line Works, Microsoft Entra ID and 1Kosmos. For other identity providers, contact the identity provider's support team for further assistance.
- Log in to your identity provider application web console with admin credentials and navigate to ADSelfService Plus from the list of applications provided.
- Either download the Metadata in XML format, or get the required data by copying the Issuer URL/Entity ID, IdP Login URL, and the X509-certificate.
Step 1: Service Provider Configuration (ADSelfService Plus)
- Log in to ADSelfService Plus web console with admin credentials.
- Navigate to Configuration tab → Self-Service → Multi-factor Authentication → Authenticators Setup.
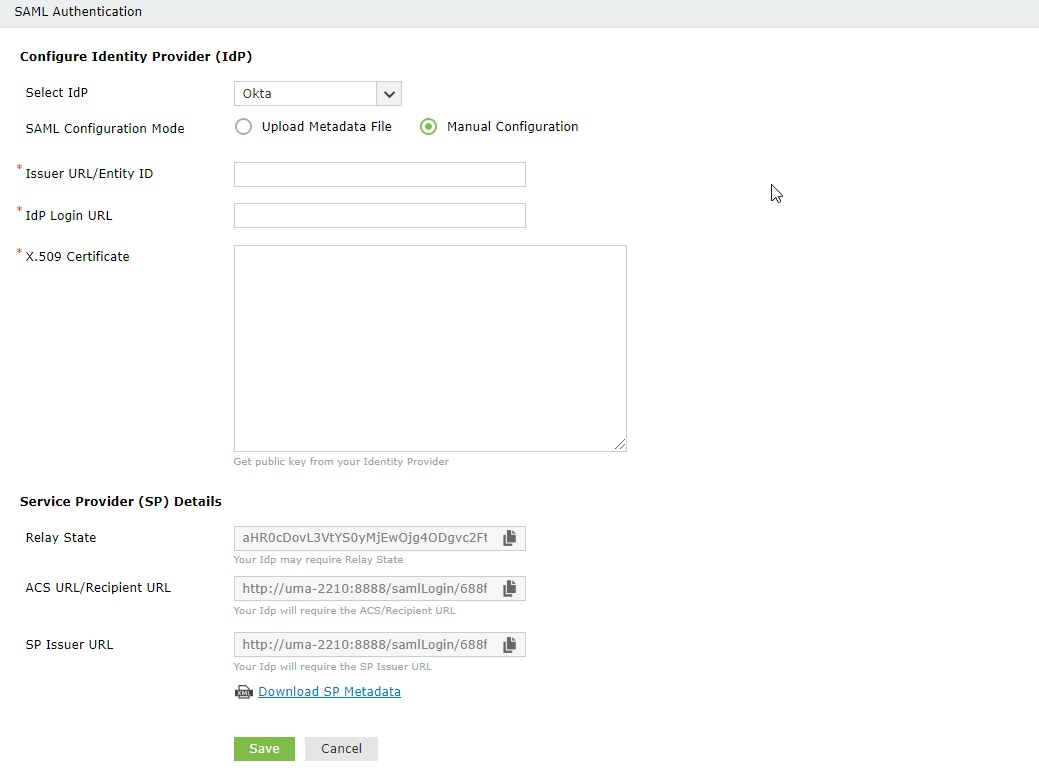
- Click SAML Authentication section. Click Modify, if you have already configured.
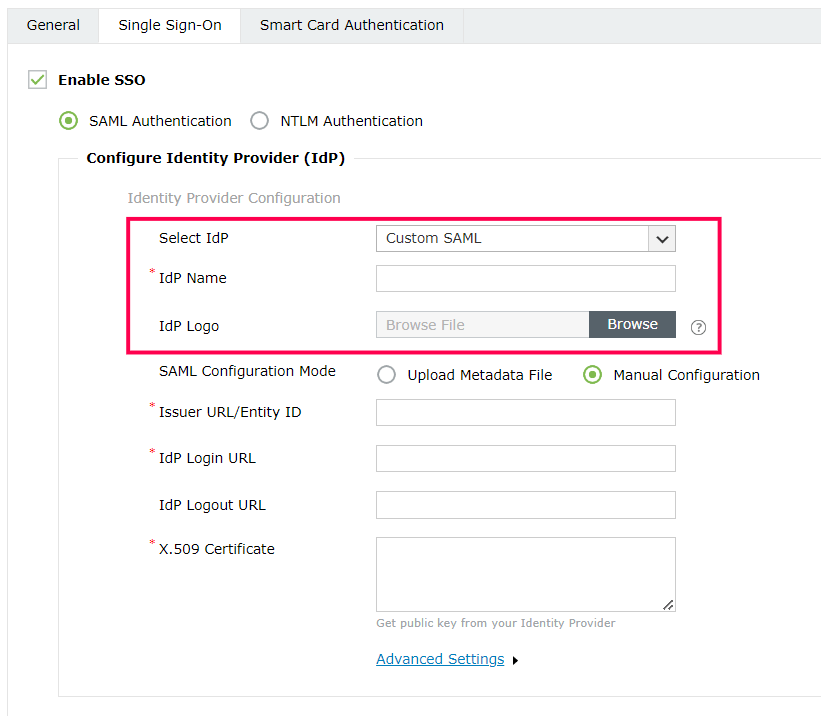
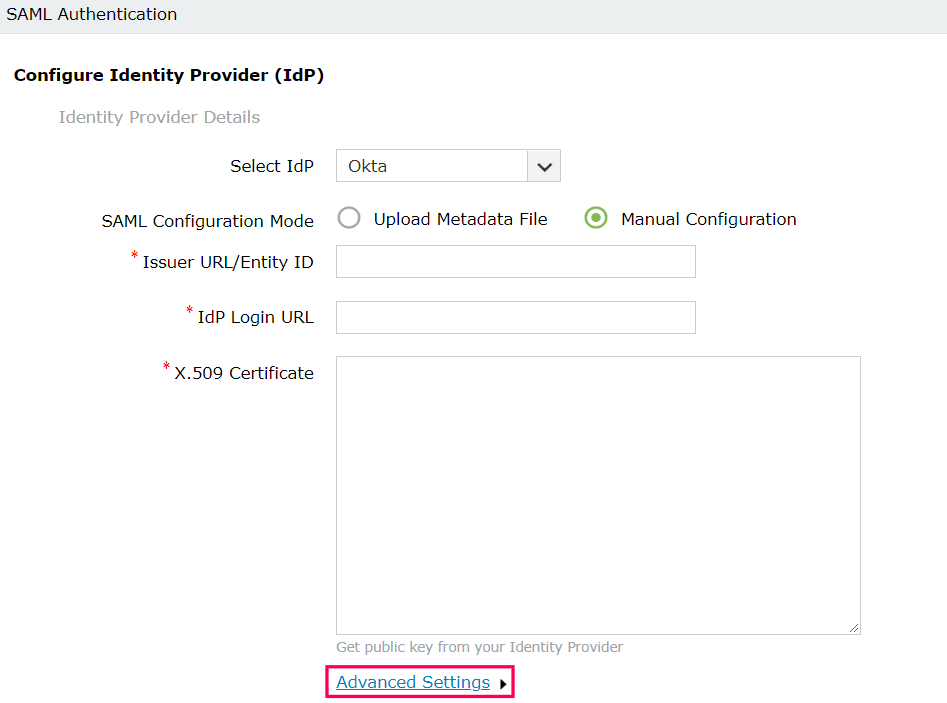
- Choose an IdP from the drop-down list.
- There are two SAML Config Modes: Upload Metadata File and Manual Configuration.
- Select Upload Metadata File to manually upload the IdP metadata file downloaded from the identity provider (Refer to step 4 of Prerequisite).
- Click Browse to upload the IdP metadata file.
- Select Manual Configuration to manually configure the URLs and certificates.
- Enter the Issuer URL/Entity ID URL obtained from the identity provider in the respective field. (Refer to step 4 of Prerequisite).
- In the IdP Login URL, enter the login URL obtained from the identity provider (Refer to step 4 of Prerequisite).
- In the space provided for X.509-Certificate, enter the public certificate key fetched from the identity provider (Refer to step 4 of Prerequisite).
Note:The X.509-Certificate begins with '-----BEGIN CERTIFICATE-----', and ends with '-----END CERTIFICATE-----'. If this pattern--though default in most cases--is absent, you'll need to manually add it to the file.
Important:
- By default, ADSelfService Plus utilizes the same SAML authentication configuration for multi-factor authentication during password self-service and single sign-on (SSO) during login. This means that the MFA SAML configurations will automatically be reflected on the logon SSO settings, if the latter is enabled.
- When you select the Create a new SAML SSO checkbox, you can maintain a separate SAML configuration for multi-factor authentication by generating a new ACS URL/Recipient URL and SP Metadata file. Use the newly generated ACS URL/Recipient URL or the SP Metadata file to create a new SAML configuration for ADSelfService Plus in your identity provider.
- Click Save, and the new ACS/Recipient URL will be generated.
- Copy the Relay State value.
- If you want to use a custom SAML IdP, select Custom SAML from the Select IdP drop-down menu, and enter the name of the IdP in the IdP Name field. You can also choose to attach the IdP's logo in the IdP Logo field.
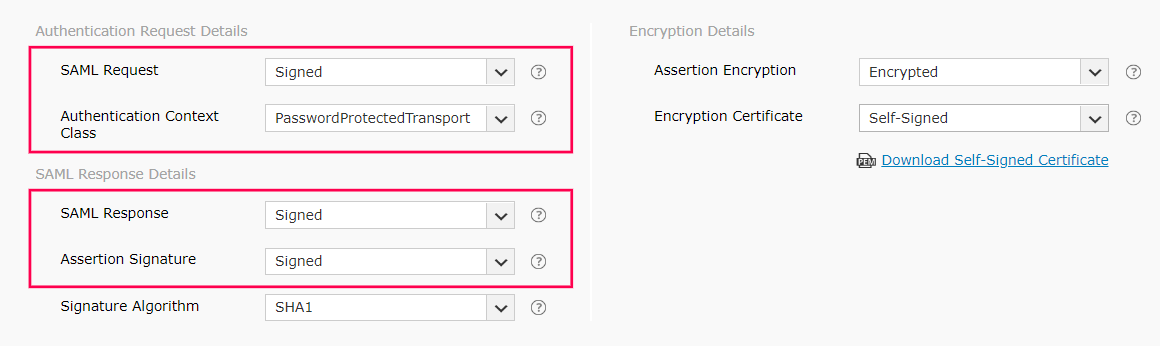
- Click Advanced Settings to configure the SAML request and response that are processed.
- Select whether the SAML request sent to the IdP is signed or unsigned from the SAML Request drop-down menu.
- Select the authentication context class sent in the SAML request from the Authentication Context Class drop-down menu.
- Select the SAML Response and Assertion Signature from the respective drop-down menus, to determine whether the messages received from the IdP are signed or not.
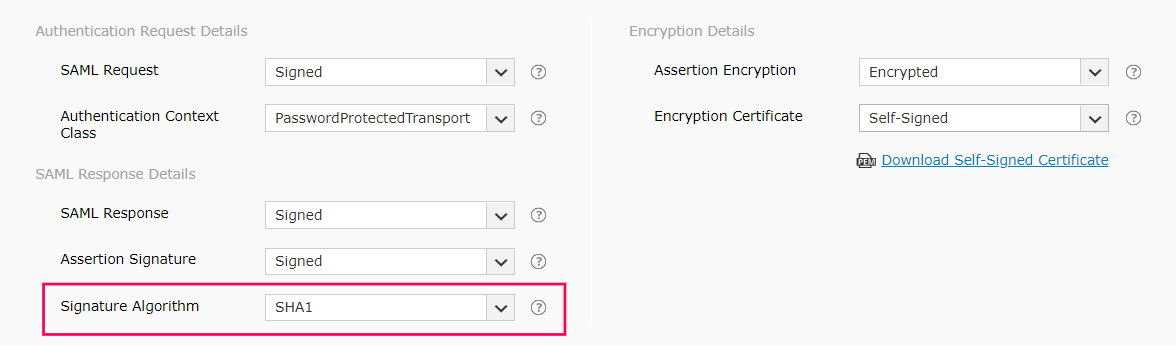
- Select the signature algorithm that the IdP uses to sign the SAML response and assertion from the Signature Algorithm drop-down menu.
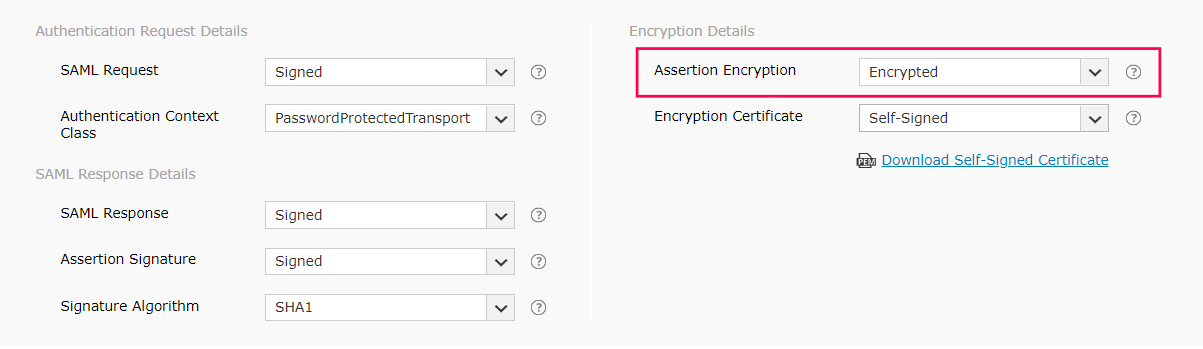
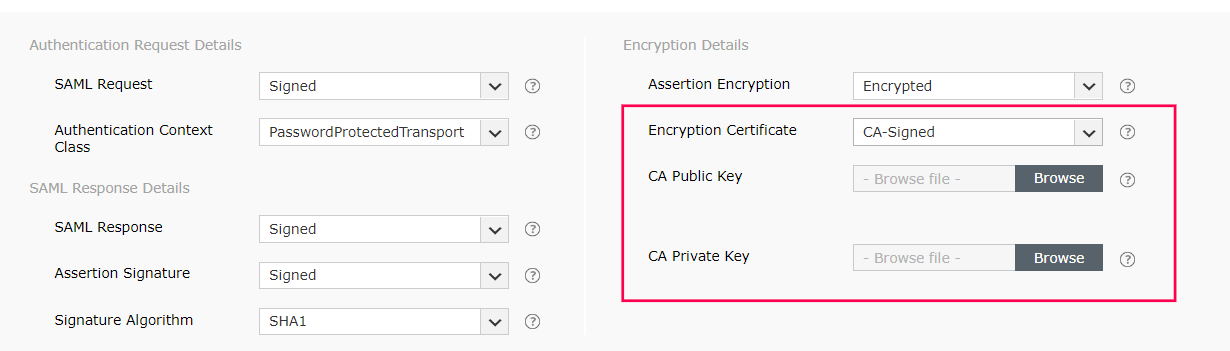
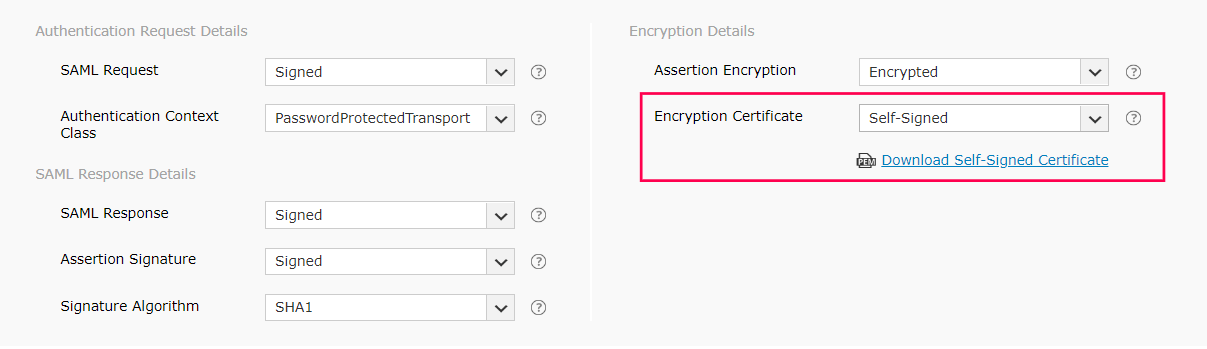
- Select whether the SAML assertion is encrypted or unencrypted from the Assertion Encryption drop-down menu.
Note: Please check with your IdP if encrypted assertion is supported.
- If the SAML assertion is encrypted, then select whether the Encryption Certificate is Self-Signed or CA-Signed from the drop-down options provided.
- If the encryption certificate is CA-Signed, then upload the CA Public Key and CA Private Key as given by the Certificate Authority.
- If the encryption certificate is Self-Signed, then you can download the self-signed certificate by clicking Download Self-Signed Certificate. You will need this for configuring SAML authentication in the IdP.
Note: You can choose which encryption certificate you want to use based on your organization's requirement. However, choosing a CA-signed encryption certificate is the recommended practice.
- Click Save.
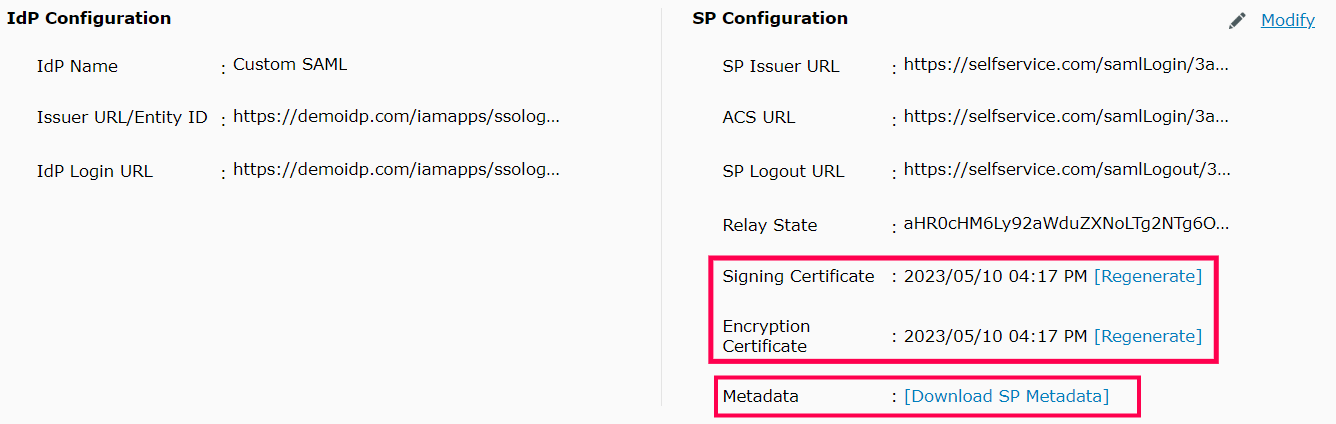
- A summary of the SP configuration is displayed below. Click Download SP Metadata to download the metadata file and save it in a location. We will need this in a later step.
- To regenerate the SAML signing and self-signed encryption certificates, click on Regenerate button corresponding to the respective Signing Certificate and Encryption Certificate fields. The certificates expire by default after a period of one year.
Note: Click
here to refer to the complete list of the SAML authentication error codes and their description.
Step 2: Setting up an SAML application in the Identity Provider
In this section we have covered the configuration steps for
A. Steps to set up a SAML application in Okta
-
Log in to Okta web console with admin credentials. Make sure you are logged in to the admin portal.
-
Navigate to the Classic UI drop-down box.
-
Go to the Applications tab > Add applications shortcut > Create New App button.
-
In the dialog box that opens, select the SAML 2.0 option, then click Create.
-
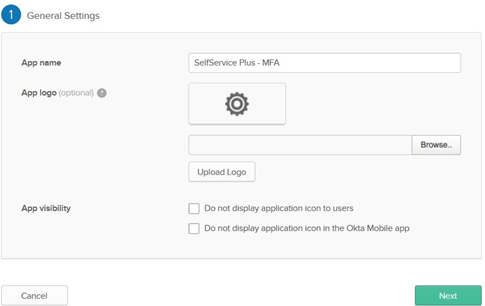
In General Settings, enter the SAML application name (Example: SelfService MFA) in the App name field. Upload a logo for the application if needed, then click Next.
-
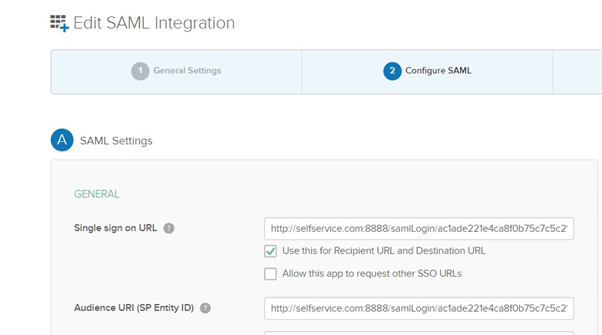
In Configure SAML, enter the ACS URL/Recipient URL into the Single sign on URL and Audience URI (SP Entity ID) fields.
-
Click Next.
-
In Feedback, select an appropriate response and then click Finish.
-
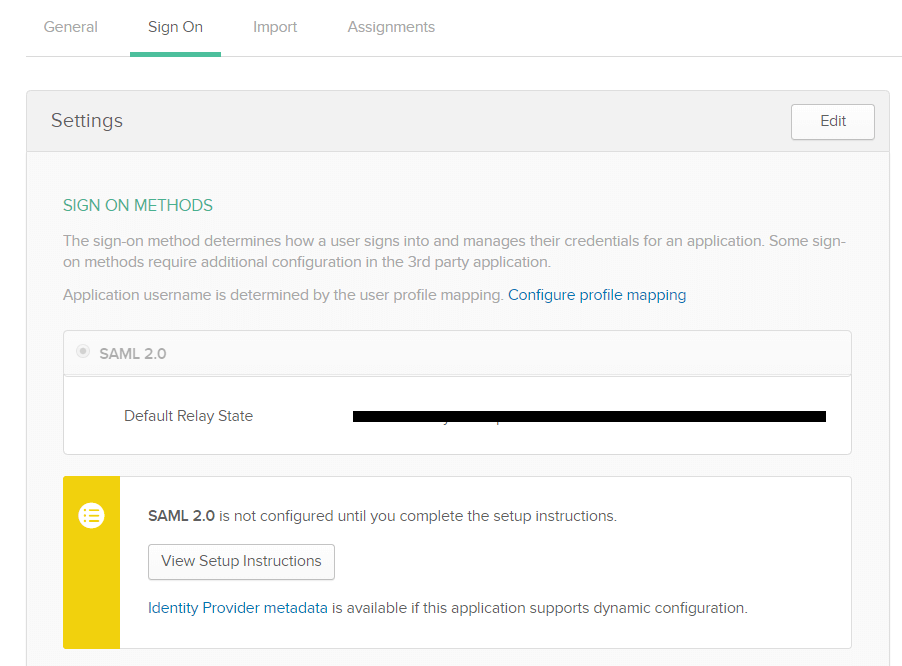
The Sign on tab of the newly created application appears. Download the metadata file by clicking the Identity Provider metadata link. You will need this file while configuring SAML authentication in ADSelfService Plus. So, save this file and keep it safe. Rename the downloaded metadata file as 'metadata_okta.xml'.
-
Click on the Assignments tab and navigate to Assign. Select Assign to People or Assign to Groups based on your requirement. After selecting an option, click the Save and Go Back button.
-
Click Done.
B. Setting up an SAML application in OneLogin:
-
Log in to OneLogin web console with admin credentials.
-
Click the Administration button.
-
Navigate to Apps tab → Add Apps.
-
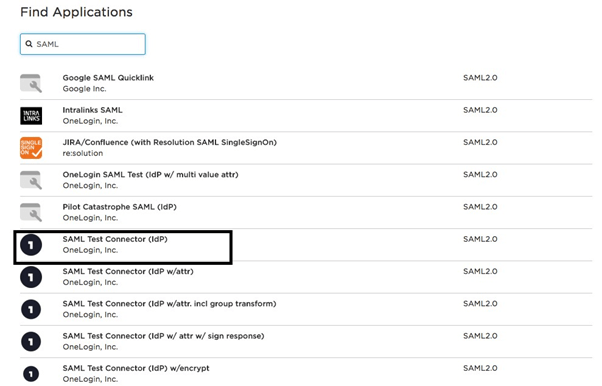
Find SAML in the Find Applications section. Select SAML Test Connector (IdP) from the search result.
-
Update the Display Name and the application logo. Click SAVE.
-
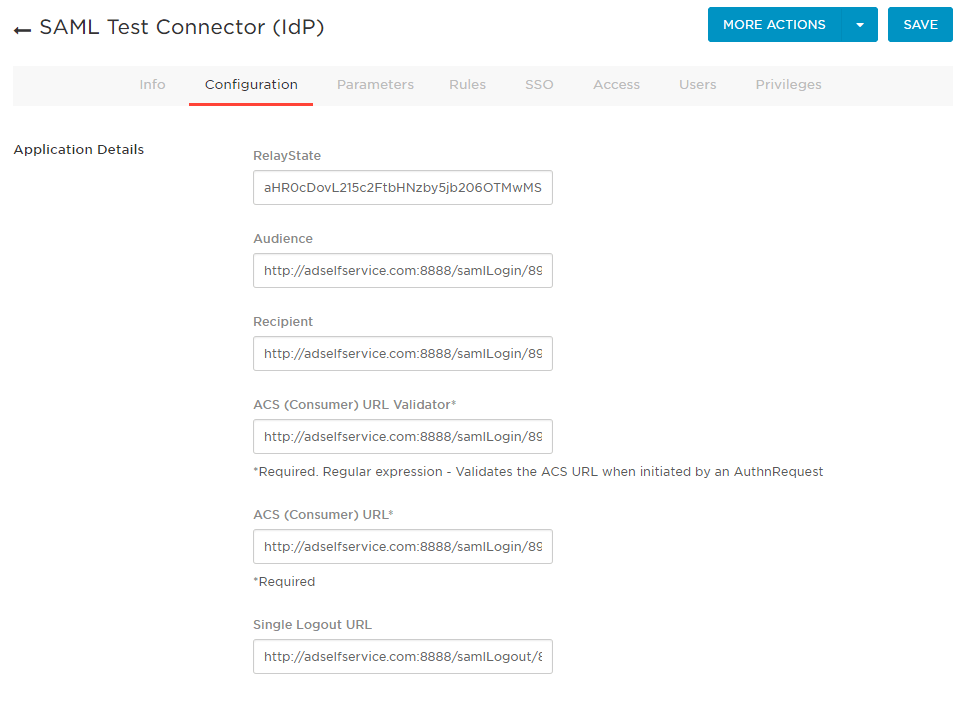
Under the Configuration tab, enter the ACS URL/Recipient URL into the ACS (Consumer) URL Validator, ACS (Consumer) URL, Recipient, and Audience fields.
Note:
-
ACS URL/Recipient URL: Log into ADSelfService Plus web console with admin credentials. Navigate to Configuration tab → Multi-factor Authentication → SAML authentication → ACS URL/Recipient URL. Copy the ACS URL/Recipient URL.
-
If your identity provider needs metadata of the service provider, click Download SP Metadata and download an XML file of your SAML configurations.
-
Click on the Users tab and assign the application to users or groups based on your needs.
-
In the MORE ACTIONS button on the top panel, select SAML Metadata to download the metadata file. You will need this file while configuring SAML authentication in ADSelfService Plus. So, save this file and keep it safe.
-
Click SAVE.
C. Setting up an SAML application in AD FS:
Prerequisites:
To configure AD FS for identity verification in ADSelfService Plus, you need the following components:
-
The AD FS server. The detailed steps for installing and configuring AD FS can be found in this Microsoft article.
-
An SSL certificate to sign your AD FS login page and the fingerprint for that certificate.
Configuration steps
Important:
Form-based authentication is the only method configured for users trying to access ADSelfService Plus through AD FS authentication, whether for intranet or extranet based use. You can view this setting in Authentication Policies > Primary Authentication > Global Settings.
Claim Rules and Relying Party Trust
During configuration, you will need to add a Relying Party Trust and create claim rules.
A Relying Party Trust is created to establish the connection between two applications for authentication purposes by verifying claims. In this case, AD FS will trust the relying party (ADSelfService Plus) and authenticate users based on the claims generated.
Claims are generated from claim rules by applying certain conditions on them. A claim is an attribute that is used for identifying an entity, to establish access. For example, the Active Directory sAMAccountName.
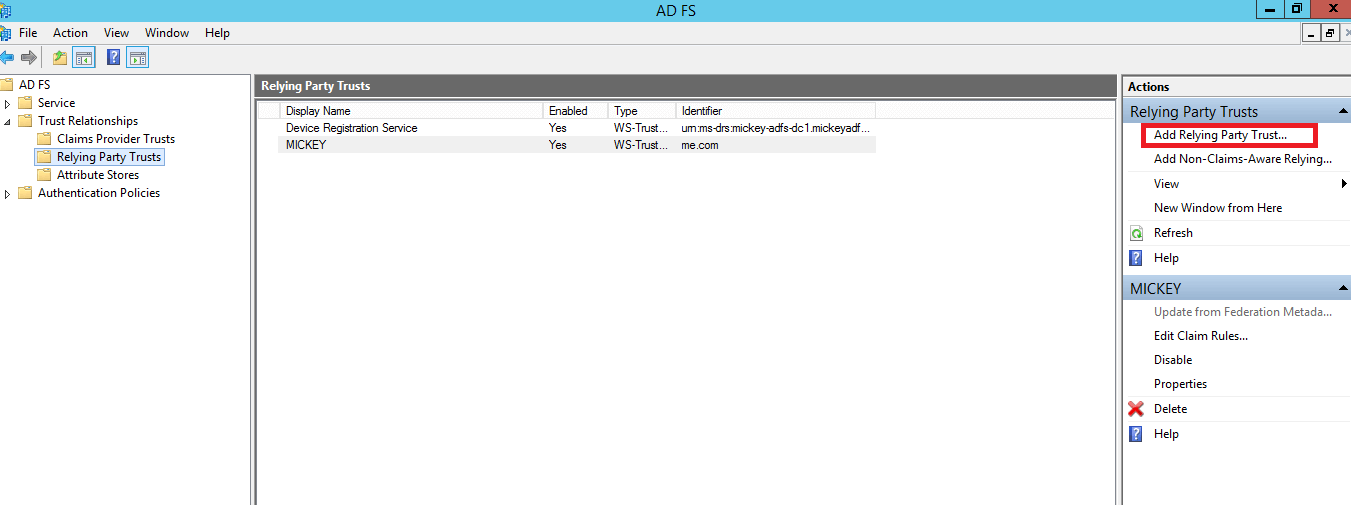
Step 1: Adding a Relying Party Trust
- The connection between AD FS and ADSelfService Plus is created using a Relying Party Trust (RPT). Select the Relying Party Trusts folder from AD FS.
-
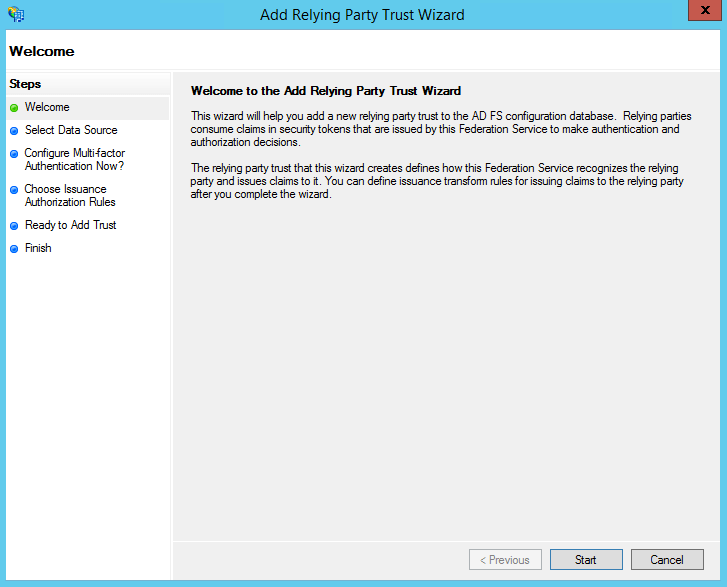
From the Actions sidebar, select Add Relying Party Trust. The Add Relying Party Trust Wizard opens.
-
Click Start.
-
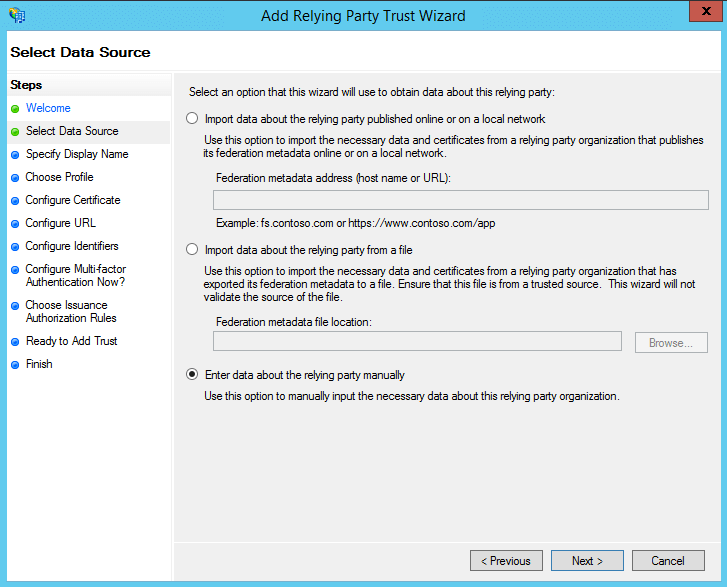
In the Select Data Source page, click on the Enter Data About the Party Manually option and click Next.
-
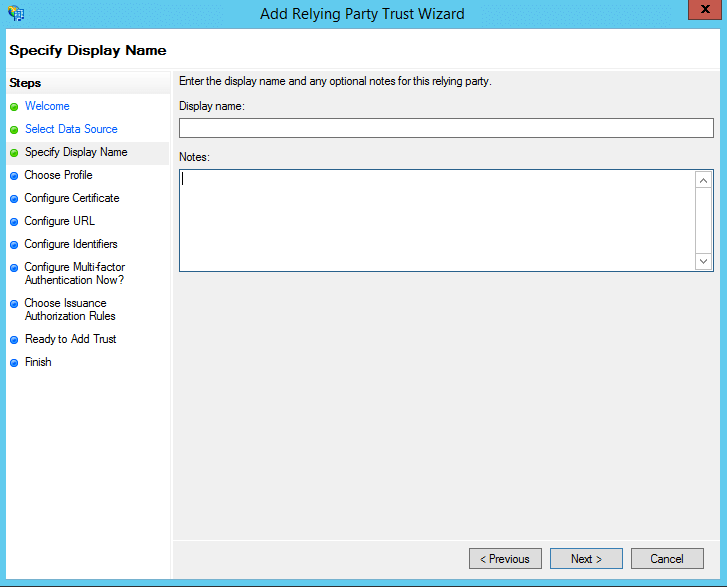
On the Specify Display Name screen, enter a display name of your choice, and additional notes if required. Click Next.
-
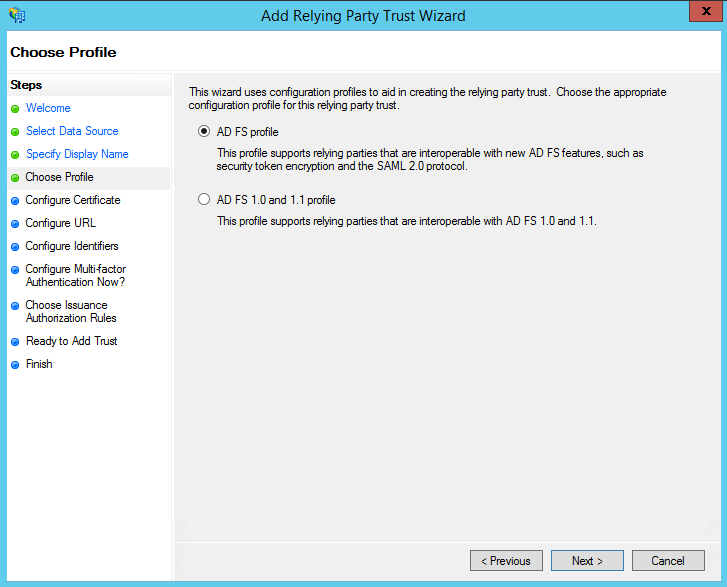
On the Choose Profile screen, click on the ADFS FS profile button. Click Next.
-
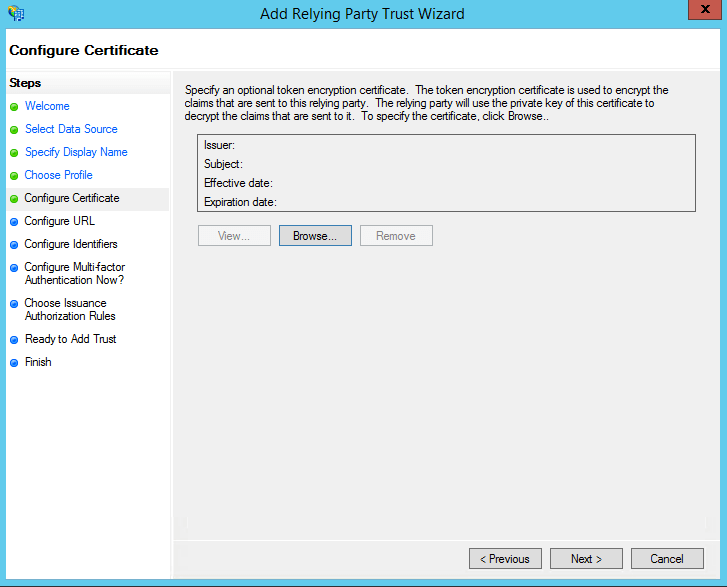
On the Configure Certificate screen, the default settings have already been applied. Click Next.
-
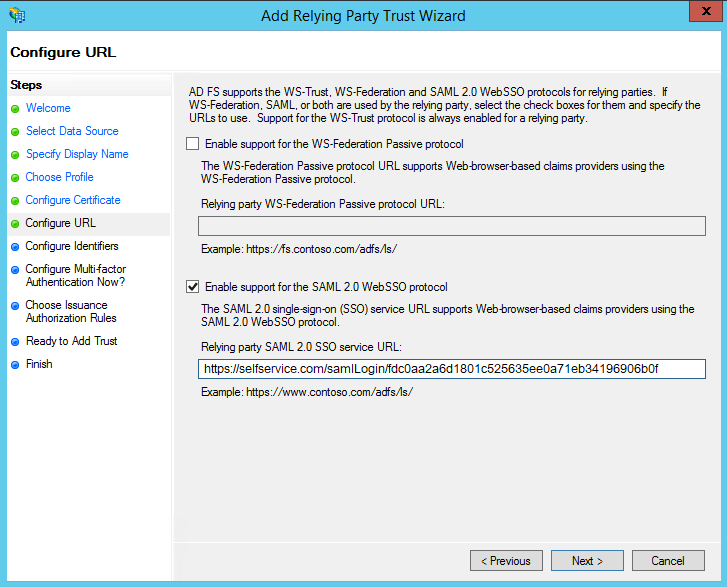
On the Configure URL screen, check the box labelled Enable Support for the SAML 2.0 WebSSO protocol. The Relying party SAML 2.0 SSO service URL will be the ACS URL of your ADSSP server. Note that there is no trailing slash at the end of the URL. For example:
https://selfservice.com/samlLogin/fdc0aa2a6d1801c525635ee0a71eb34196906b0f
Note:
ACS URL/Recipient URL: Log in to ADSelfService Plus web console with admin credentials. Navigate to Configuration tab → Multi-factor Authentication → SAML authentication → ACS URL/Recipient URL. Copy the ACS URL/Recipient URL.
-
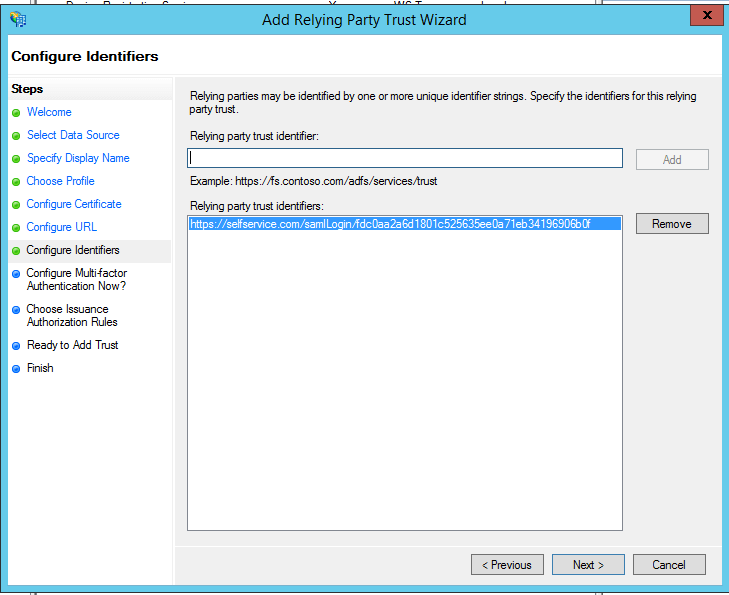
On the next screen, in the Relying party trust identifiers option, add SP Issuer URL (Ex: https://selfservice.com/samlLogin/fdc0aa2a6d1801c525635ee0a71eb34196906b0f)
-
On the next screen, you can choose to configure multi-factor authentication settings for the relying party trust. Click Next.
-
On the Choose Issuance Authorization Rules screen, you can choose to either Permit all users to access this relying party or Deny all users to access this relying party. Click Next.
-
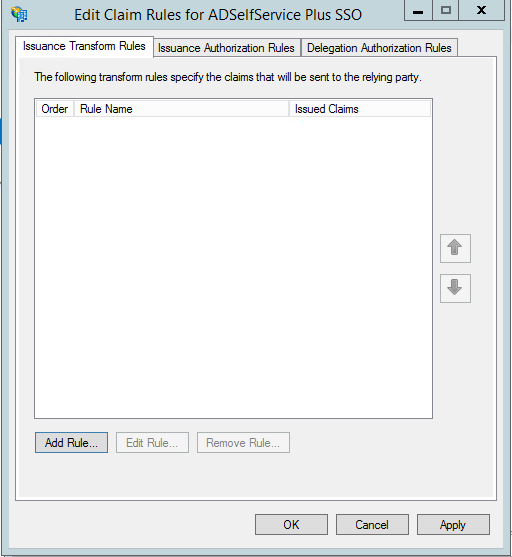
The next two screens will display an overview of the settings you have configured. On the Finish screen, click Close to exit the wizard. If you have selected the Open the Edit Claim Rules dialog for this relying party trust when the wizard closes option, the Claim Rules editor will automatically open.

Step 2: Creating Claim Rules
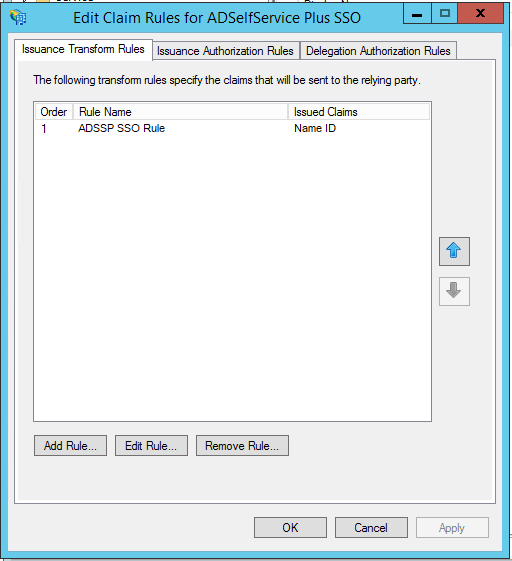
Once you have configured the Relying Party Trust, you can create the claim rules using the Claim Rules Editor which opens by default when you finish creating the trust.
-
To create a new rule, click on Add Rule.
-
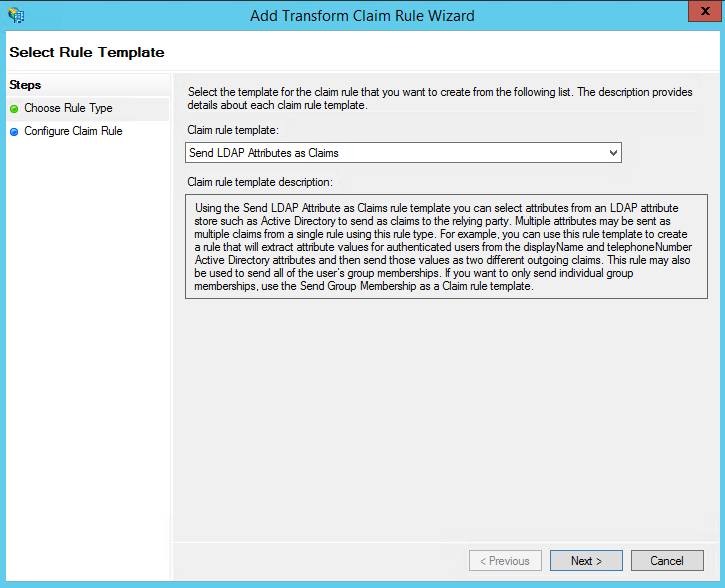
From the list of claim rule templates available, select Send LDAP Attributes as Claims. Click Next.
-
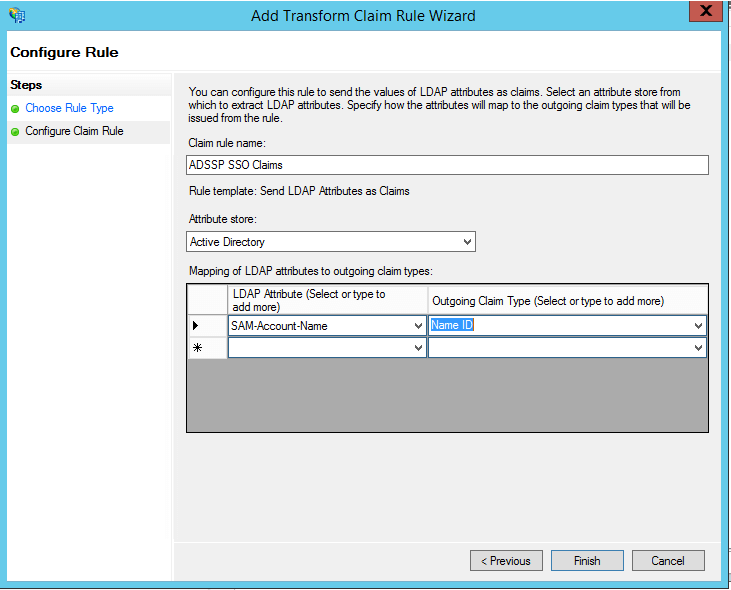
On the next page, provide a Claim rule name and select Active Directory as the attribute store.
-
From the LDAP Attribute column, select SAMAccountName.
-
From theOutgoing Claim Type column, select Name ID.
-
Click Finish to save the rule.
Note:
You can choose multiple LDAP attributes and map them to their corresponding outgoing claim types. For example, you can add attributes such as the Given Name, Surname, Phone Number, etc.
After completing the AD FS configuration, download the metadata file by clicking on the Identity Provider metadata link. For example:
https://server_name/FederationMetadata/2007-06/FederationMetadata.xml.
You will need this file while configuring SAML authentication in ADSelfService Plus. So, save this file and keep it safe.
Step 3: Enabling SAML logout option
-
Navigate to the Relaying Party Trusts and find the rule you've created.
-
Right-click on the selected rule and click Properties.
-
In the window which opens, find the Endpoints tab and click Add SAML button.
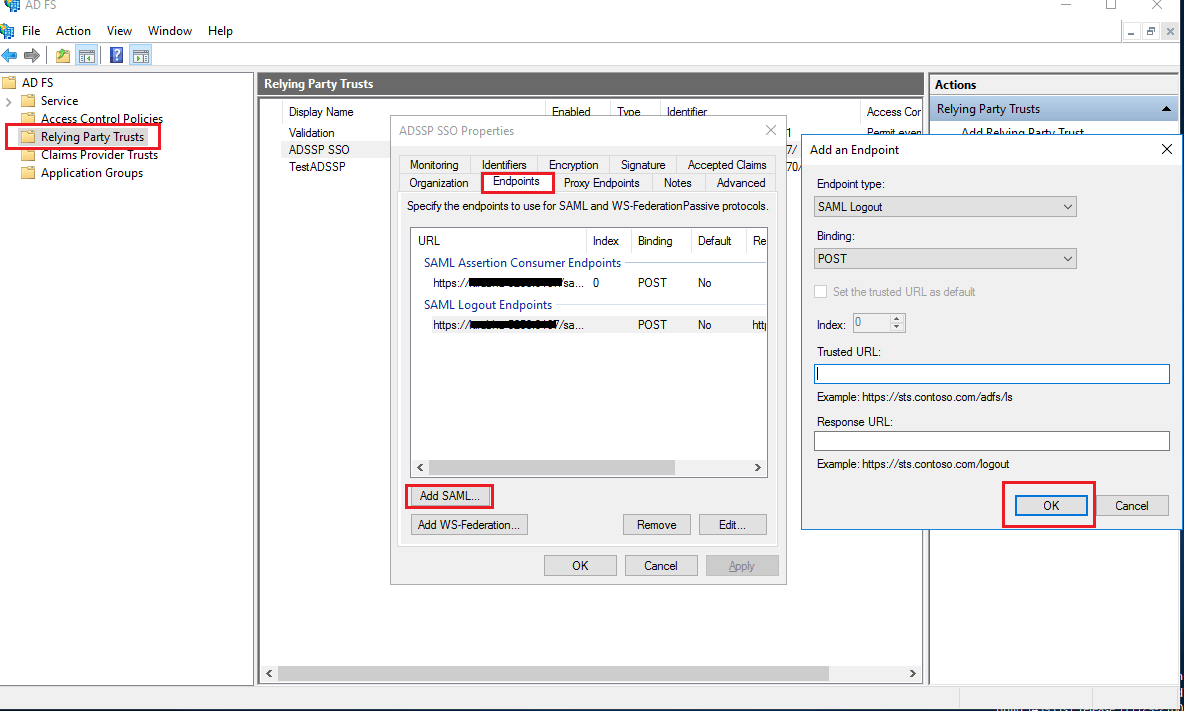
-
In the Trusted URL, paste the SP Logout URL copied from step 1 of prerequisites.
-
In the Signature tab, upload the X.509-certificate in PEM format from the step 4 of prerequisites.
-
Click OK.
IdP-initiated SSO for ADSelfService Plus
Follow these steps to authenticate your ADSelfService Plus account through AD FS.
Prerequisite
Enable RelayState in AD FS.
-
For Windows Server 2012:
-
Navigate to the
%systemroot%\ADFS\Microsoft.IdentityServer.Servicehost.exe.config file in your AD FS server.
-
In the <microsoft.identityServer.web> section, enter the following code: <useRelayStateForIdpInitiatedSignOn enabled="true" />
Sample code:
<microsoft.identityServer.web>
…..
<useRelayStateForIdpInitiatedSignOn enabled="true" />
</microsoft.identityServer.web>
-
Restart the AD FS server.
-
For Windows Server 2016:
-
Open Powershell with administrative properties in your AD FS server.
-
Run the following command to enable IdP-initiated SSO:
Set-ADFSProperties -EnableIdPInitiatedSignonPage $true
-
Run the following code to enable RelayState:
Set-ADFSProperties -EnableRelayStateForIDPInitiatedSignon $true
-
Restart the ADFS server.
Steps to generate an IdP URL:
-
Log in to ADSelfService Plus web console with admin credentials.
-
Navigate to Admin tab → SSO Settings.
-
In the Service Provider Details section of SAML Authentication, copy the Relay State and the SP Issuer URL.
-
Open a word processor and enter the following command:
<IdP_URL_String>RelayState=RPID=<SP_Issuer_URL>&RelayState=<Relay State>
Note:
In the place of IdP URL String, enter https://<ADFSserver>/adfs/ls/idpinitiatedsignon.aspx, where ADFSserver in the server in which the ADFS is deployed.
-
Give the word document a name, and save it. Encode the saved URL.
Sample code:
Once the code is encoded, it will look like the URL below:
https://example.com/adfs/ls/idpinitiatedsignon.aspx?RelayState=RPID%3Dhttps%253A%252F%252Fselfservice-0001%253A9267%252FsamlLogin%252F88d9537b8c5f7376fc78fdfb7591601e85aa8ebb%26RelayState%3DaHR0cHM6Ly9raXJ1YmhhLTUyNTg6OTI2Ny9zYW1sTG9naW4vTG9naW5BdXRo
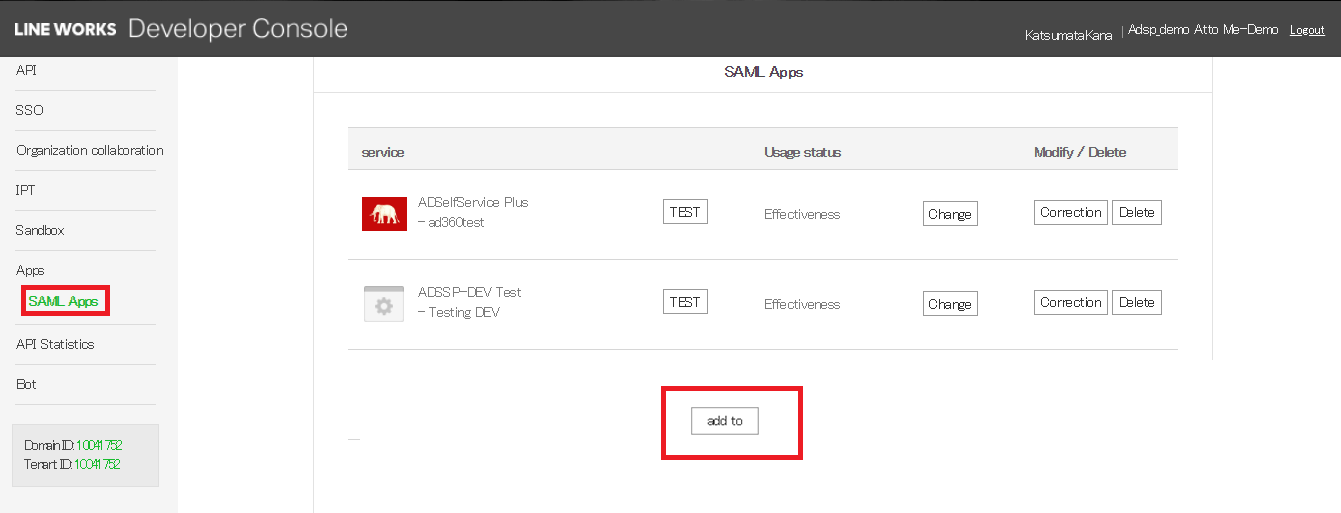
D. Steps to set up a SAML application in Line Works
-
Log in to Line Works Developer console. Go to the Apps section > SAML Apps click add to button.
-
In the window that opens, provide an appropriate Application Name, Description, and Logo in the respective fields.
-
In the ACS URL field and the Issuer URL/Entity ID, enter the ACS URL/Recipient URL of ADSelfService Plus.
Note:
ACS URL/Recipient URL: Log into ADSelfService Plus web-console with admin credentials. Navigate to Configuration tab → Multi-factor Authentication → SAML authentication → ACS URL/Recipient URL. Copy the ACS URL/Recipient URL.

-
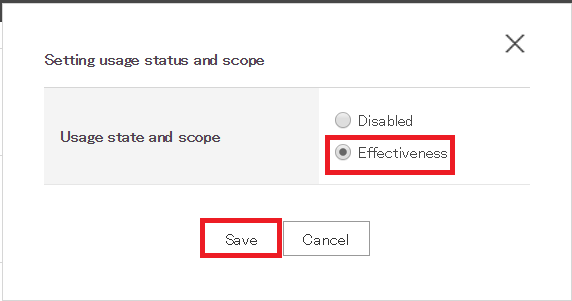
In the popup window that opens, click OK.
-
Go to SAML Apps section and find the application you have just created. Click the Change button and change the status to 'Effectiveness'. Click Save.
E. Steps to set up a SAML application in Microsoft Entra ID
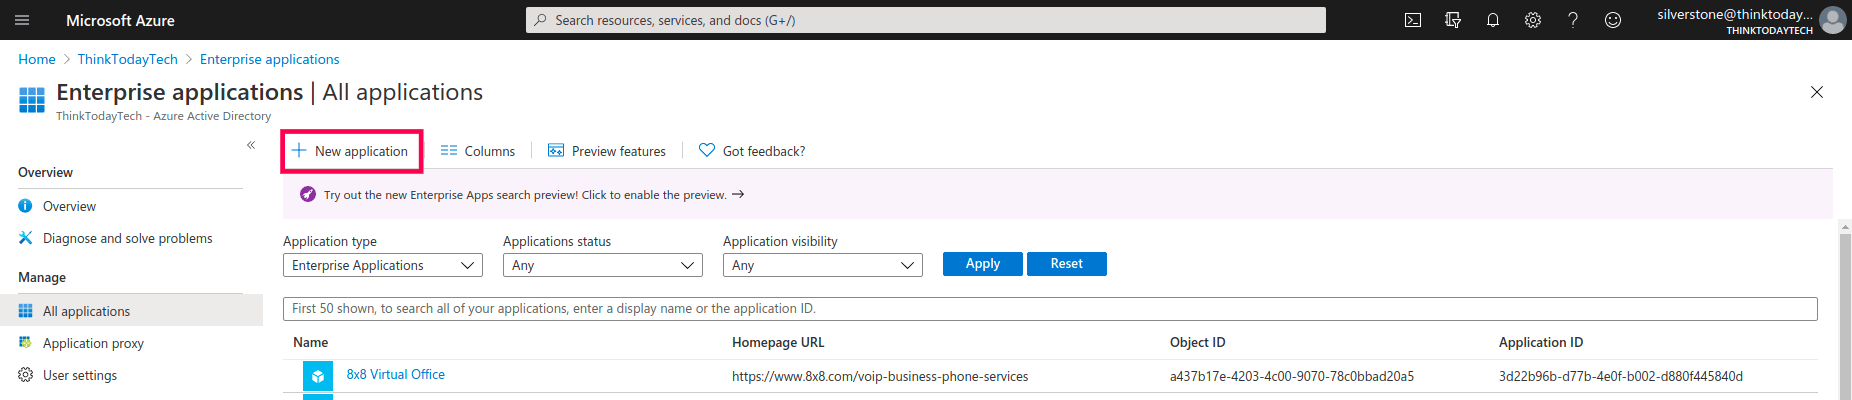
- Log in to Microsoft Entra ID using Global Admin credentials.
- Go to Azure Azure Active Directory > Enterprise applications > All applications.
- Select New application.
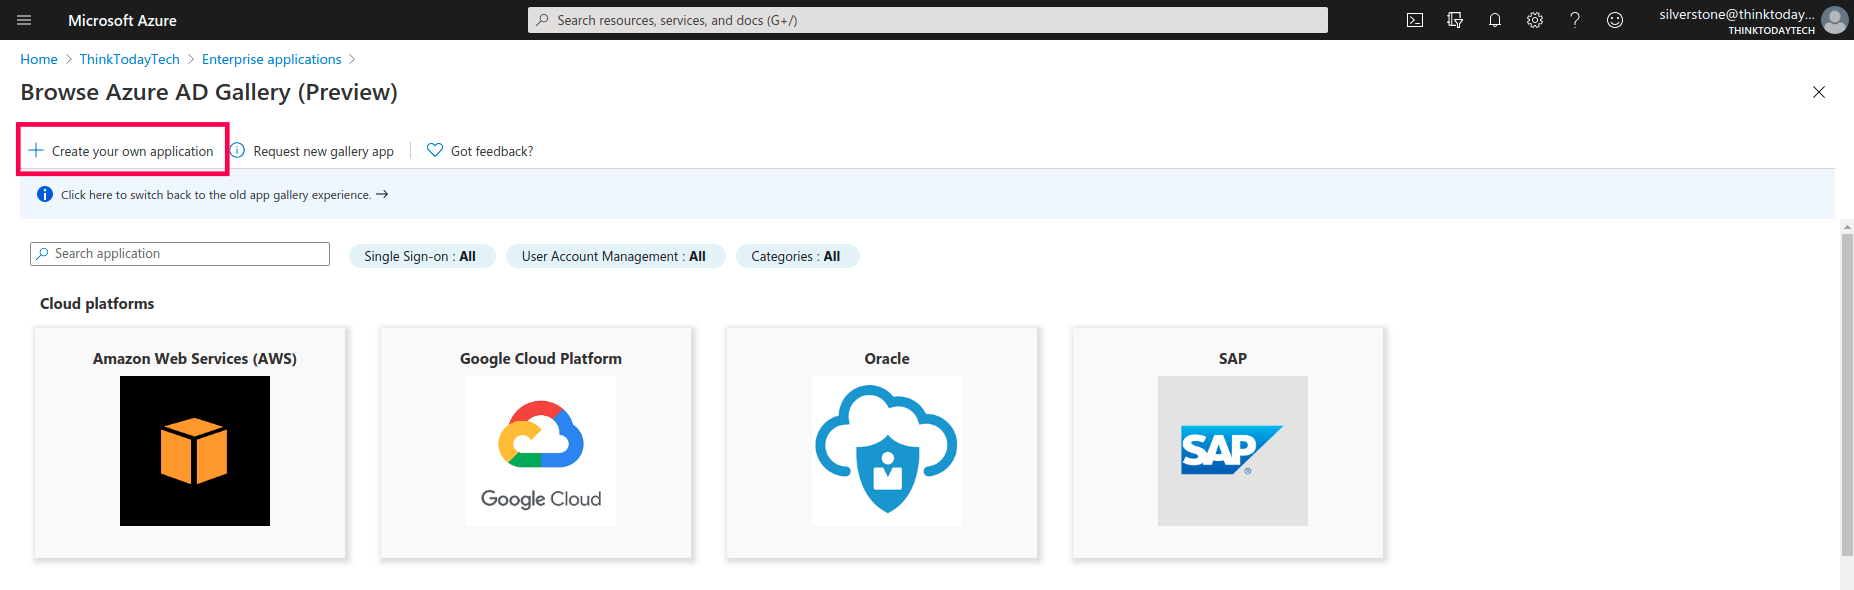
- Click Create your own application.
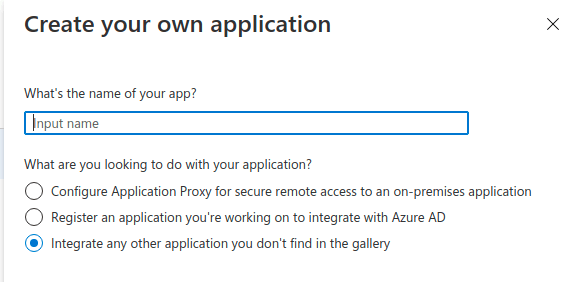
- In the pop-up that appears, enter a name for ADSelfService Plus. Select the Integrate any other application you don't find in the gallery radio button, and click Create.
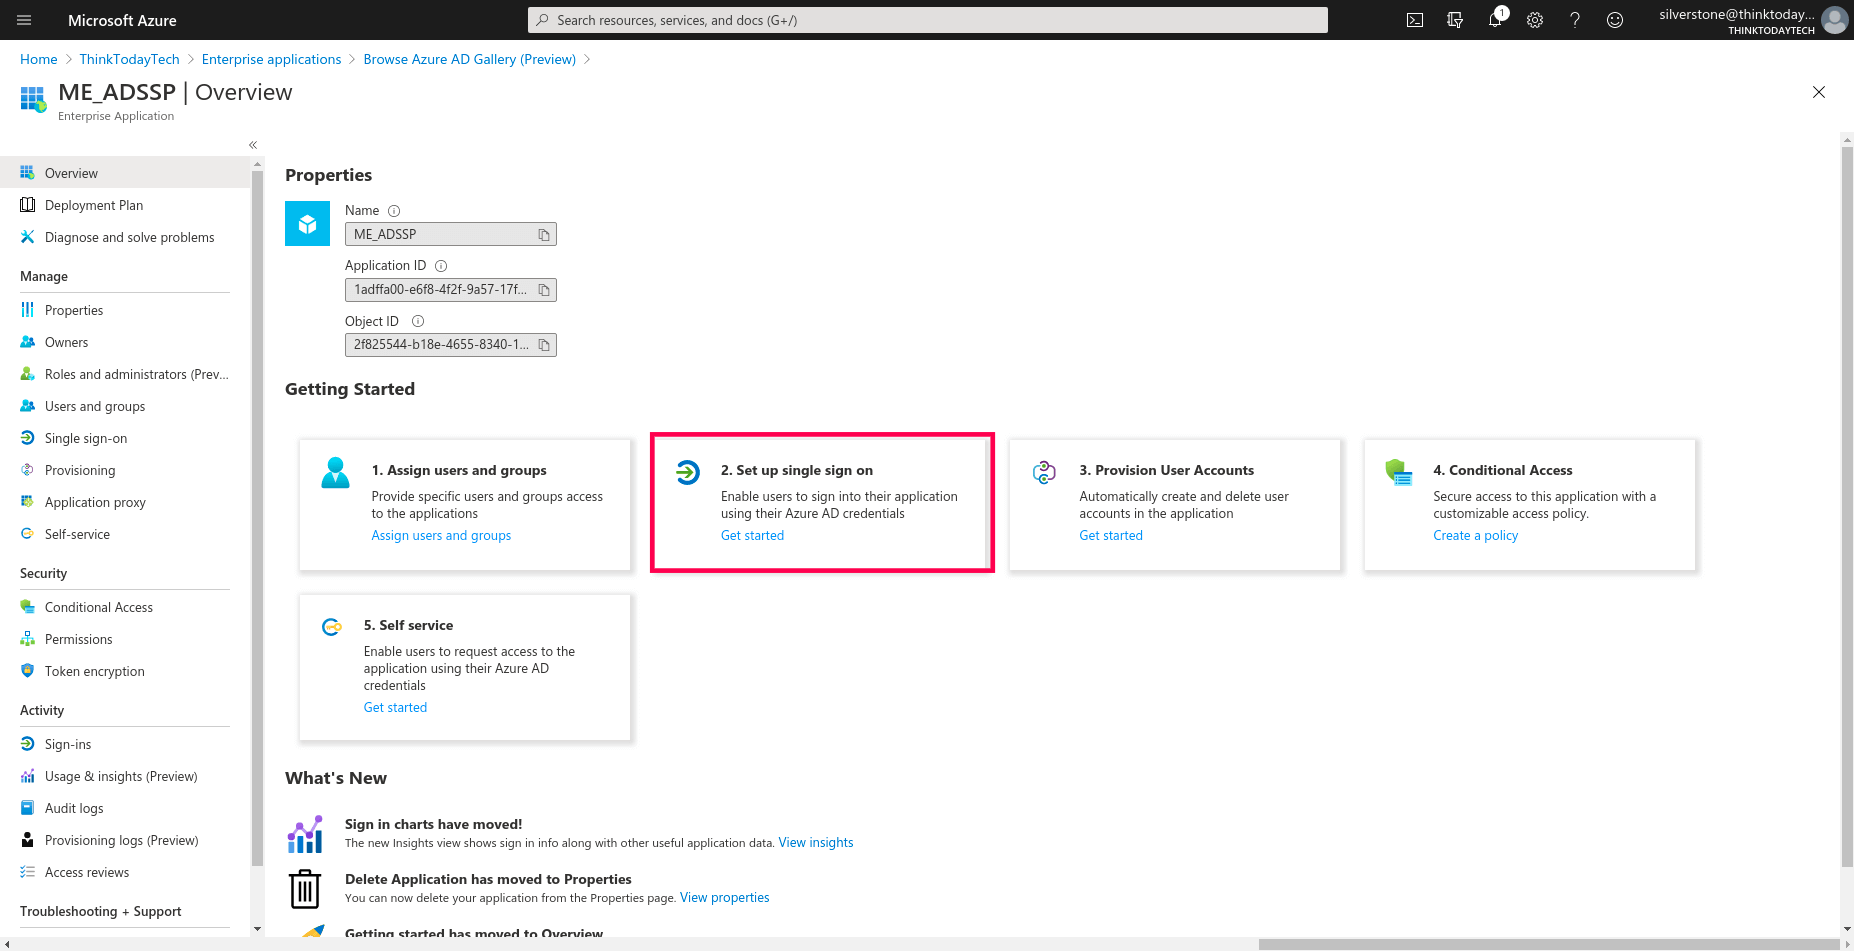
- On the next page, select Set up single sign on.
- Select SAML, and click Edit under Basic SAML Configuration. Fill in the following details copied in Step 4 of Prerequisites:
- Identifier: SP Issuer URL
- Reply URL: ACS URL/Recipient URL
- Relay State: Relay State
- Sign on URL: Access URL of ADSelfService Plus
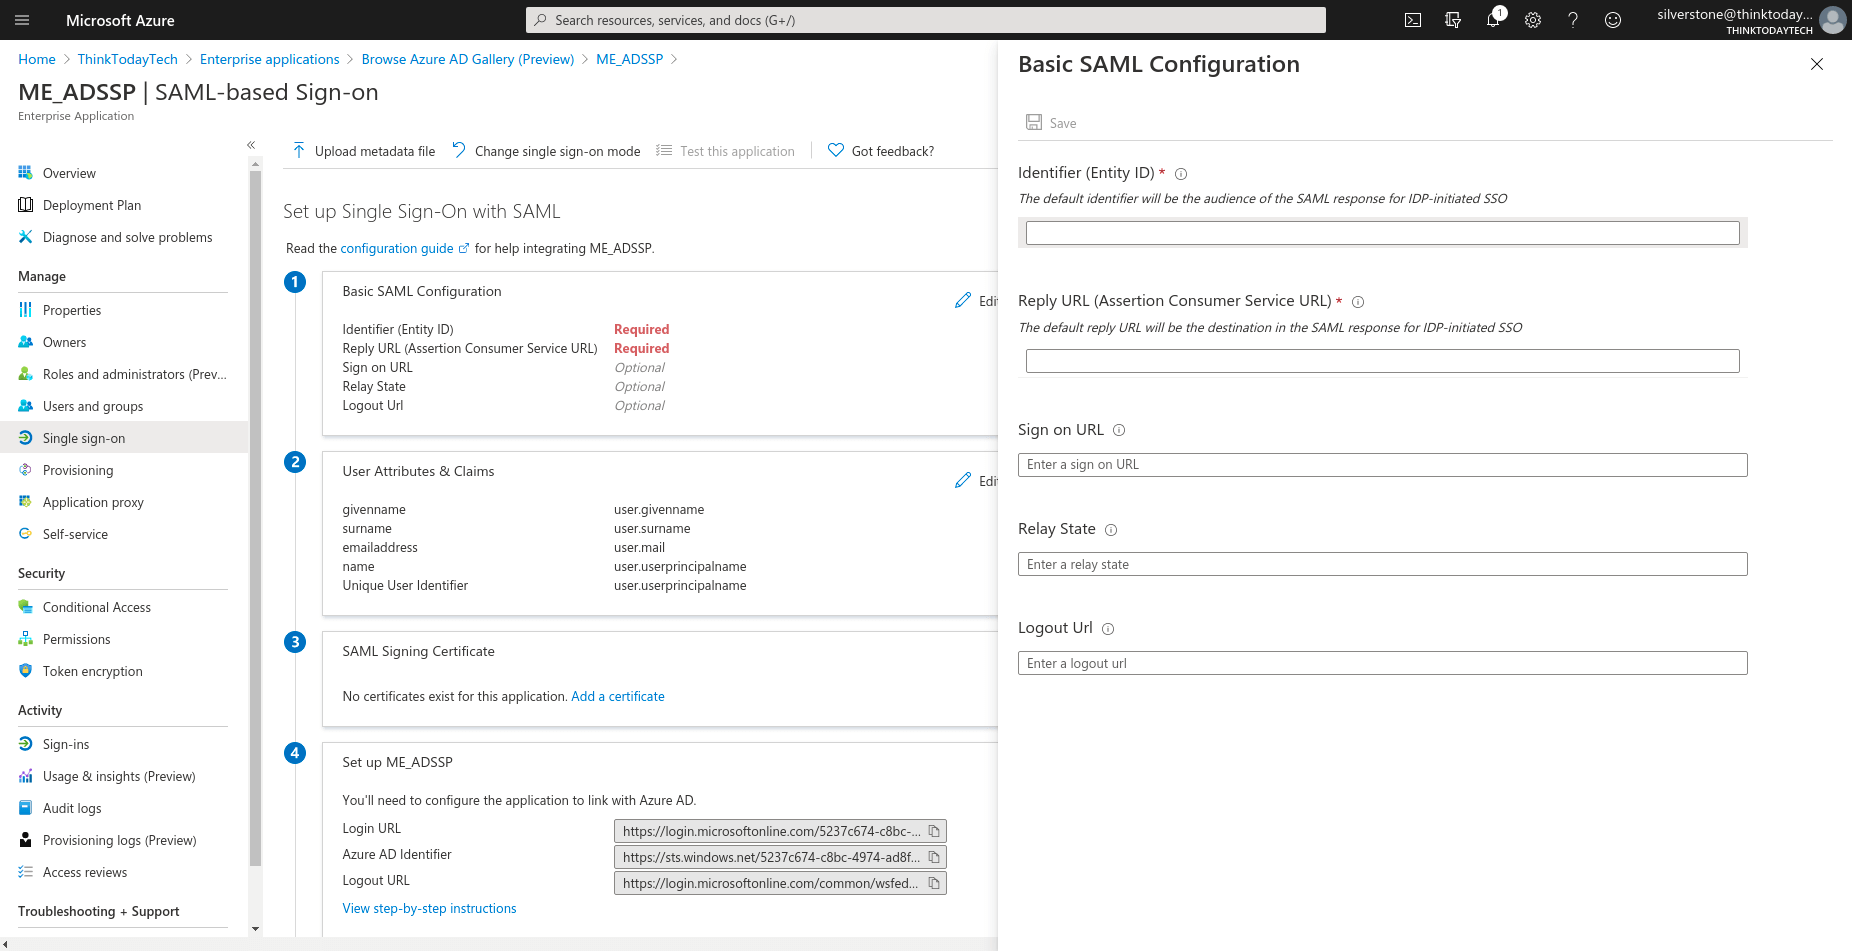
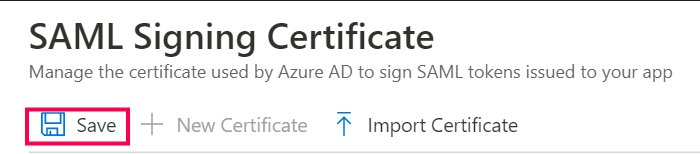
- Navigate to SAML Signing Certificate, and click Add a certificate. Here you can create a new SAML signing certificate, upload a self-signed certificate that you’ve generated, or upload a certificate obtained from a CA.
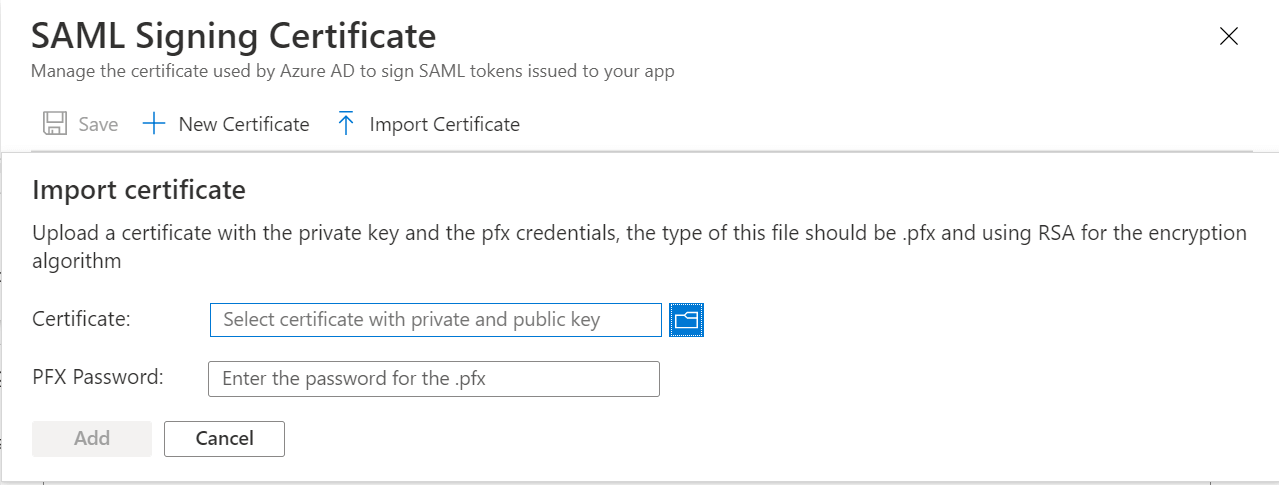
- To import a certificate: Click Import Certificate.
- Upload the certificate and enter the PFX password.
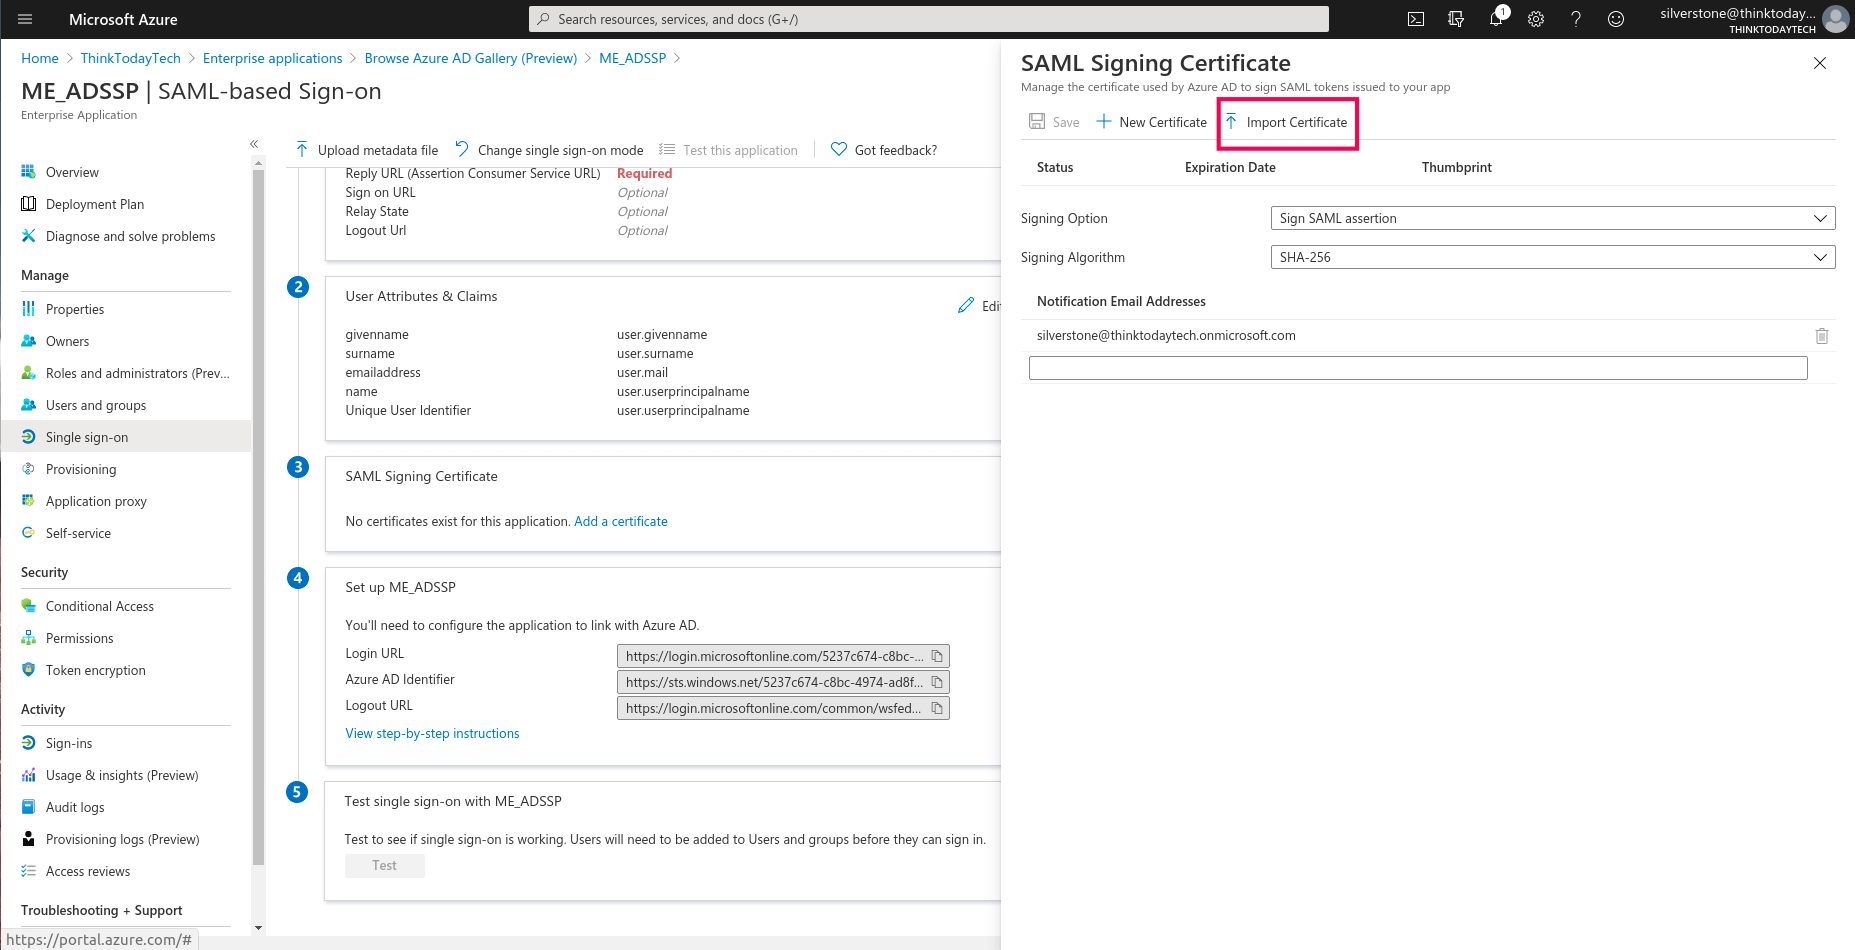
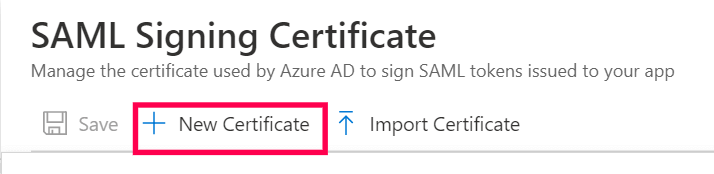
- To add a new certificate: Click New Certificate and then Save.
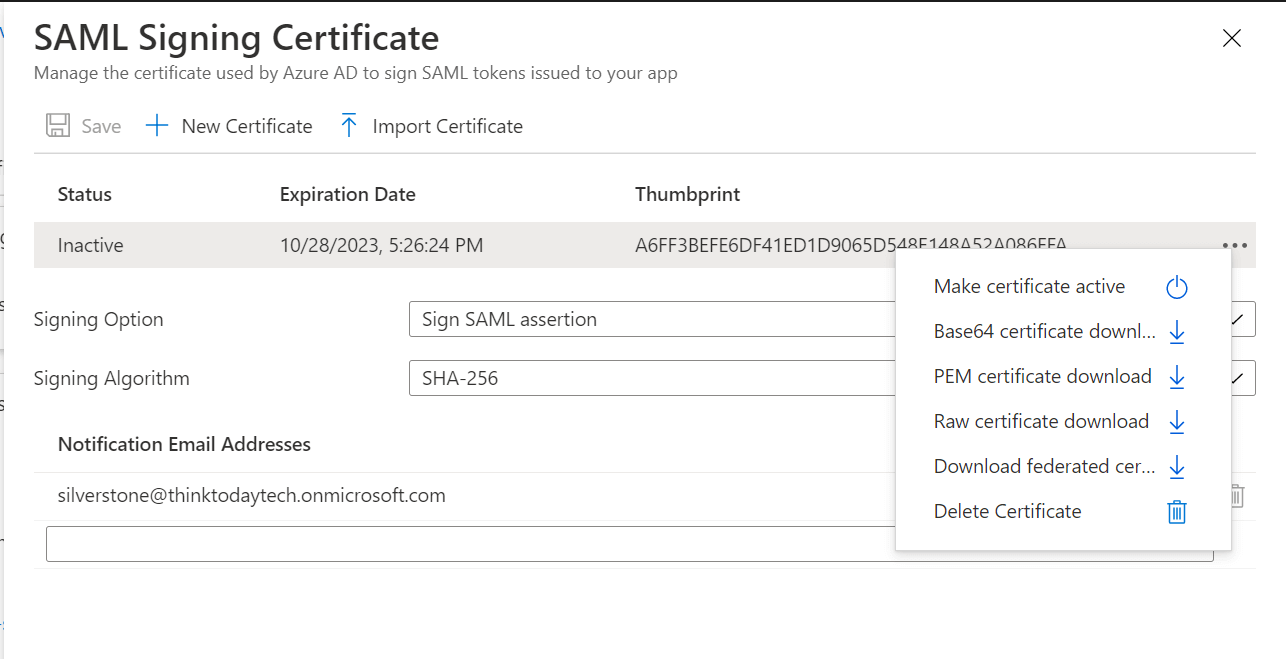
- Click the
 icon in the certificate's entry, and select Make certificate active.
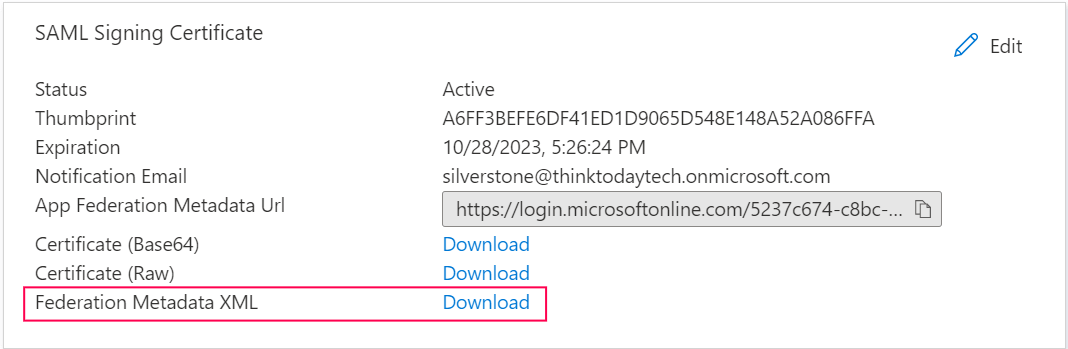
- After closing the screen, download the metadata file by clicking the Download button next to Federation Metadata XML.
- After completing the ADSelfService Plus (SP) configuration steps, test the single sign-on functionality by clicking Test.

F. Steps to set up a SAML application in 1Kosmos
- Log in to the 1Kosmos AdminX portal using admin credentials.
- Navigate to Applications > Manage Applications, and click Add an Application.
- Locate SAML 2.0 Generic under Custom App, and click Add Integration to begin configuring the SAML application.
- Review the displayed information outlining the access and privileges required to proceed, then click Add Application.
- Under the Basic Settings section:
- Enter an appropriate Application Name (e.g., ADSelfService Plus).
- Choose the desired Instance Type (Production or Sandbox).
- Enter the Access URL forADSelfService Plus in the following format: https://<FQDN_FOR_ADSSP>/ For example: https://adselfservice.com/
- SAML Configurations can be done either by uploading the metadata file or by manually entering the required values .
-
In the SAML Settings section, you can upload the metadata file downloaded from ADSelfService Plus. This will automatically populate the Assertion Statement under SAML settings, as well as the Entity ID and ACS URL under Advanced Options
-
Alternatively, you can manually configure the following:
- Assertion Statement under SAML settings
- Format: urn:oasis:names:tc:SAML:1.1:nameid-format:emailAddress
- Value: email (located under BlockID Session Attributes)
- Advanced Options
- Entity ID: Enter the SP Issuer URL obtained from ADSelfService Plus
- Assertion Consumer Service (ACS) URL: Enter the ACS URL obtained from ADSelfService Plus and set the Method to POST.
- Under the Advanced Option section,go to the Certificates section to upload the PEM-encoded X.509 certificate downloaded from ADSelfService Plus and enable the Assertion checkbox to ensure the SAML assertion is signed.
- Click Save.


 ADManager Plus
 ADAudit Plus
 Exchange Reporter Plus
 M365 Manager Plus